

Easy Homemade Pizza Dough for a Standard Home Oven
Olive oil keeps the crust tender during long oven bakes, while a slow rise builds classic flavor in this easy homemade pizza dough.
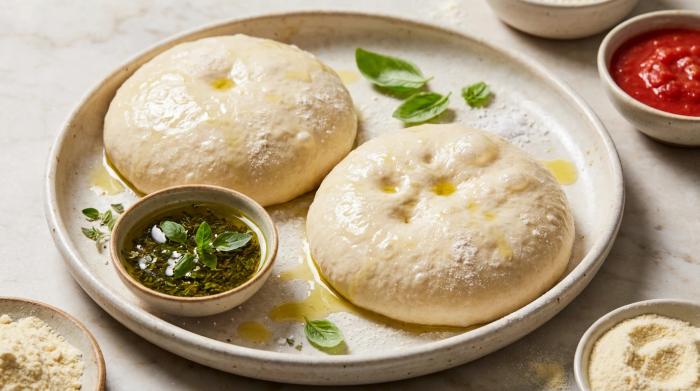
Standard kitchen ovens run cooler than commercial pizza ovens, so this Easy Homemade Pizza Dough for a Standard Home Oven includes olive oil to keep the crust soft during longer bakes. A slow rise builds classic yeast taste, yielding enough dough to bake 3 pizzas right away.
Flour and yeast choices
Choosing bread flour or pizza flour yields a chewier crust with larger air pockets, though all-purpose flour works as a direct substitute. Measure carefully, as adding excess flour creates a tough and dry crust. Rapid rise or instant yeast blends right into your dry ingredients without blooming. If substituting active dry yeast, you must first dissolve it in the warm tap water along with the sugar. Fresh yeast also works when you dissolve 15.5 grams in the warm water and sugar. Test your tap water to ensure it is warm rather than hot, because high temperatures will kill the yeast. When swapping out the kosher salt or cooking salt for standard table salt, decrease the measurement to 1 1/2 teaspoons.
Making the Dough
Start by placing the flour, yeast, sugar, and salt in a large bowl. Mix the dry ingredients together.
Make a well in the center of the flour. Pour in the extra-virgin olive oil and warm tap water.
Mix the wet and dry ingredients until they come together. Take 1/2 tablespoon of extra flour and sprinkle it over your counter. Scrape the loose dough out of the bowl.
Gather the loose pieces with your hands. Press them into a single ball. Knead the dough ball for 5 minutes by hand until the texture feels smooth.
Electric mixers knead the dough in three minutes. Kitchen processors finish the job in forty seconds when you slowly stream the water in while the machine runs.
First Rise
Form the freshly kneaded dough into a smooth sphere. Drizzle 2 teaspoons of extra olive oil into a large bowl. Drop the dough inside, turn it over, and rub the top surface to guarantee it is fully coated in oil.
Cover the bowl and set it aside for 1 to 2 hours. You want the dough to look twice as large.
Optional Cold Ferment
You can bake the dough on the same day or chill it for extra flavor development. The bowl can stay in the fridge for up to 5 days. Leave the risen dough alone while it rests and avoid deflating it.
Portioning & Second Rise
Scrape the dough out of the bowl. You will feel the dough fully deflating as you press it into a log. Cut the log to make three pieces. Each piece should weigh 11.6 oz (330 g).
Shape each portion by pulling the edges down and gathering them at the base. Keep tucking the sides underneath until the top stretches tight and smooth.
Place the balls on a tray. Point the seamless tops toward the ceiling and space them 2 inches (5 cm) to 4 inches (10 cm) apart. Sprinkle the balls lightly with flour and rub them. Cover the balls and seal the tray. This provides clearance for the dough to expand beneath the wrapping. Leave the balls at room temperature for 1 hour, or keep them in the fridge for 3 to 4 hours. Wait until they look nearly twice as large. The dough balls can sit at room temperature for up to 5 hours if you keep them in a cool room and cover them with a damp cloth.
Shaping the Crust
Preheat your oven to 530°F (275°C) and put a shelf inside. Dust the counter with 1/2 tablespoon of extra flour. Set down a single ball of dough. Deflate the dough gently out to 8 inches (20 cm). Leave the outer rim alone. Touching the edges knocks the air out and stops the crust from puffing up.
Spread out the dough and stretch it evenly toward a 12-inch (30 cm) circle. Pull the dough outward to keep the texture light. Drag the dough across the counter to finish the stretch. Leave a 1/3-inch (1 cm) edge completely untouched. You can patch any tears in the raw dough by pressing the pieces back together.
Topping & Baking
Spread 1/4 cup of pizza sauce across the crust. Add 1 1/3 cups (130 g) of freshly grated mozzarella and your choice of toppings. Freshly grated cheese melts smoothly and weighs less than pre-shredded cheese. Store-bought shredded cheese contains anti-caking agents that stop it from melting properly. Keep your toppings light. Heavy layers weigh down the dough and cause a soggy center.
Bake the pizza for 10 minutes total. A pan with large holes crisps the base better than a solid sheet. Rotate the pizza at 4 minutes, and check it at 8 minutes. Pull the pizza from the oven once the cheese melts and golden spots appear.
Freezing and serving
You can par-bake stretched bases for 2 minutes to freeze them for future use. Wrap them securely, and they will keep for several months.
For leftover pizza, heat the slices in a covered skillet to restore a crisp crust.
Cut the hot pizza into wedges and serve it right away. Repeat the shaping, topping, and baking process for the remaining two balls.
Easy Homemade Pizza Dough for a Standard Home Oven
Ingredients
- 4 cup bread flour or pizza flour, or plain/all-purpose
- 2 tsp rapid rise or instant yeast
- 4 tsp white sugar
- 1 tbsp extra flour
- 4 tbsp extra-virgin olive oil
- 1.33 cup warm tap water
- 2 tsp extra olive oil
- 1.33 cup tightly packed freshly grated mozzarella cheese, per pizza
- 0.25 cup pizza sauce, per pizza
- Toppings of choice
- 2.5 tsp kosher salt or cooking salt
We may earn a small commission from grocery & equipment links, at no cost to you. Disclosure.
Method
Making the Dough
First Rise
Optional Cold Ferment
Portioning & Second Rise
Shaping the Crust
Topping & Baking
Substitutions
You can swap the bread flour for all-purpose flour, but bread flour creates a chewier crust with larger air pockets.
If using active dry yeast instead of instant yeast, dissolve it in the warm water with the sugar before mixing it into the dry ingredients.
You can substitute the kosher salt with one and a half teaspoons of regular table salt.
Storage
For the best flavor development, leave the covered bowl in the fridge for an Optional Cold Ferment of up to five days.
Par-bake stretched bare crusts for two minutes if you want to freeze them securely wrapped for several months.
Bring back a crisp crust on any remaining slices by warming them in a covered skillet.
Serving
Cut the hot pizza into wedges and serve it right away while the cheese is still perfectly melted and stretchy.
Common mistakes
Avoid using store-bought shredded cheese because anti-caking agents prevent smooth melting and add excess weight.
During Topping & Baking, do not overload your pizza with heavy toppings because this will weigh down the dough and cause a soggy center.
Techniques
When Shaping the Crust, avoid touching the outer edges so you do not knock out the air and prevent puffing during baking.
Baking the pizza on a pan with large holes crisps the base much better than using a solid baking sheet.
Always preheat your baking stone or steel for at least forty-five minutes before baking to maximize crust crispness and oven spring.
Let any cold refrigerated dough sit at room temperature for thirty to sixty minutes before stretching so the gluten relaxes and it does not snap back.
- Store
- For the best flavor development, leave the covered bowl in the fridge for an Optional Cold Ferment of up to five days. Par-bake stretched bare crusts for two minutes if you want to freeze them securely wrapped for several months. Bring back a crisp crust on any remaining slices by warming them in a covered skillet.
Can I use a machine for Making the Dough instead of kneading by hand?
Yes, an electric mixer kneads the dough in three minutes. You can also use a motorized kitchen prep appliance, which finishes the task in forty seconds if you add the water slowly while the machine is operating.
How do I use fresh yeast to make this Easy Homemade Pizza Dough for a Standard Home Oven?
You can replace the instant yeast by dissolving 15.5 grams of fresh yeast in the warm tap water with the sugar. Once dissolved, pour the liquid into the well of your dry ingredients.
Why does this recipe include olive oil when traditional pizzas often do not?
Home ovens require longer baking times to fully cook the dough. Mixing olive oil into your ingredients keeps the crust tender and stops it from drying out during those extra minutes in the oven.
What happens if I accidentally tear a hole while Shaping the Crust?
If a tear appears in the raw dough, simply press the broken pieces back together to patch it. Remember to pull the dough gently outward as you stretch to maintain a light texture and avoid weak spots.
What if my Portioning & Second Rise gets delayed?
The portioned dough balls can sit safely at room temperature for up to five hours as long as they are kept in a cool room. Just make sure to cover them with a damp cloth so the surface does not dry out.
Can I prepare the crusts now and bake them on another day?
Yes, you can par-bake the stretched bare bases for two minutes and freeze them securely wrapped for several months. Alternatively, you can leave the unshaped dough in the fridge for an Optional Cold Ferment of up to five days before portioning.
Why do I need to let refrigerated dough sit out before stretching it?
Letting cold dough rest at room temperature for thirty to sixty minutes relaxes the gluten networks. This makes the dough much easier to shape and prevents it from snapping back like a rubber band.
Why is it important to preheat a baking stone or steel for pizza?
Preheating your baking surface for at least forty-five minutes before cooking provides an immediate blast of high heat to the bottom of the crust. This maximizes bottom crispness and helps the edges puff up quickly in the oven.
Add a private note
Private to this device - jot your tweaks, swaps and timings. (Syncs to your account later.)
What to serve with it
See all →





You might also like
See all →



The Friday 3-recipe dinner plan 🧡
Every Friday: three tested weeknight dinners + one shopping list, ready to go. No spam, ever - unsubscribe anytime.