
The Ultimate High-Shine Chocolate Mirror Glaze Cake
A flawless chocolate mirror glaze creates a highly reflective, professional finish that turns any layered cake into a show-stopping dessert.
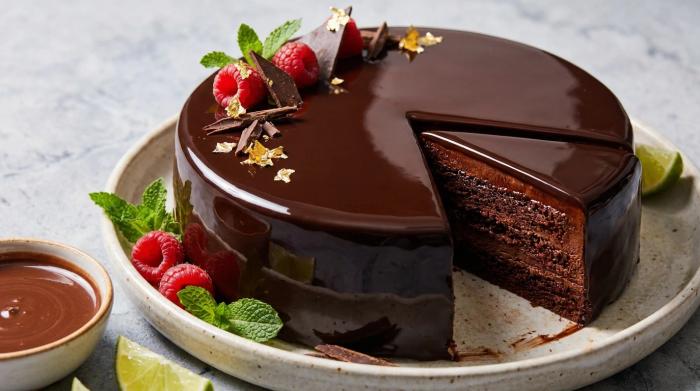
A flawless dark chocolate coating requires an exact pouring temperature of 86°F (30°C). The Ultimate High-Shine Chocolate Mirror Glaze Cake uses a mixture of gelatine, cocoa powder, and cream to form a bright reflective surface. The thin layer sets flat and stays glossy over a firm ganache base.
Preparing the Cake
The liquid coating requires a perfectly smooth exterior of dark chocolate ganache to prevent sinking and highlight a reflective finish. Airy cakes will dent under the weight of this layer. Cut the tops of your baked tiers to make them level before applying the frosting.
You must chill the frosted cake in the refrigerator for at least one hour. Cold layers handle easily and keep the warm glaze from melting the underlying frosting. Glaze poured on an unfrosted cake absorbs into the crumb and creates a bumpy texture.
The gelatine
Powdered gelatine gives the coating its glossy finish and sets it into a soft layer. Place cold tap water in a small bowl and sprinkle the gelatine evenly over the surface.
Let the bowl sit for five minutes. The powder blooms into a rubbery paste.
Mixing the Glaze
Dutch-processed cocoa powder brings an intense flavor and a dark color to the mixture. Caster sugar melts faster than standard granulated sugar, but you may use granulated white sugar provided it dissolves completely during boiling. Put the sifted cocoa powder and water into a medium saucepan and whisk them into a smooth slurry. Creating this mixture first helps minimize over-mixing later.
Add a splash of pure cream to loosen the mix, then stir in the remaining cream and sugar. Stop whisking now. A fast whisk introduces permanent air bubbles into the liquid. Heat the pan over medium high heat until it just begins to boil.
Remove the pan immediately and drop in the bloomed gelatine.
Stir gently until the gelatine dissolves and the liquid looks smooth.
Cooling and Straining
Strain the hot glaze into a clean bowl. Hold the strainer very close to the bowl. A long drop pushes air into the mixture.
Tear off a sheet of plastic wrap and press it directly against the warm liquid. Direct contact stops a skin from forming on the surface.
Leave the bowl on the counter for two hours until the liquid reaches exactly 86°F (30°C). If you pour the glaze while it is too hot, the ganache base melts. If you pour it too cold, the coating forms thick drips. Twist the bowl side to side to force trapped bubbles to the center.
Pouring the Glaze
Transfer the chilled cake to a wire rack set over a catching tray. Pass the liquid through a strainer one final time. Pour the glaze directly over the center of the cake in a steady flow. Keep the liquid falling heavily so it pushes outward and down the sides. Never stop pouring or let the flow drop to a weak trickle.
Move the cake to a serving platter within ten minutes, before the glaze becomes firm. If you move a fully set cake, the bottom edges drag and tear.
You can repair small blemishes by dropping leftover glaze onto the empty gaps. Glide a warmed palette knife over the additions so they sit flat. Edible gold leaf or gold dust also hides minor imperfections.
Serving
Fingers leave permanent marks on a set mirror glaze. Cut the cake cleanly by dipping your knife blade into a jug of warm tap water. Wipe the blade dry before you slice. Push the knife straight down and lift the wedge out. Repeat this dipping and drying routine for every single cut.
Leftovers and storage
The glaze seals the cake completely, which keeps the interior moist.
- Store the glazed cake uncovered in the refrigerator.
- Keep the cake at room temperature as long as the room stays below 77°F (25°C).
- Make the glaze ahead of time and refrigerate it for up to one week.
- Reheat cold glaze in short microwave increments and strain it to remove new bubbles.
The Ultimate High-Shine Chocolate Mirror Glaze Cake
Base Cake
- 1 x 8-inch (20 cm) chocolate cake, baked in 2 layers
- 2 batches dark chocolate ganache
Gelatine
- 2.5 tbsp cold tap water
- 4 tsp gelatine powder
Glaze Liquids
- 1 cup unsweetened cocoa powder, sifted
- 1 cup plus 2 tbsp white caster or superfine sugar
- 0.67 cup water
- 0.67 cup pure cream or whipping cream
Garnish
- Edible gold dust and gold leaf, optional
We may earn a small commission from grocery & equipment links, at no cost to you. Disclosure.
Method
Preparing the Cake
Mixing the Glaze
Cooling and Straining
Pouring the Glaze
Serving
Substitutions
Standard unsweetened cocoa powder can easily replace the Dutch-processed cocoa if that is what you have in your pantry.
You can swap the caster sugar for standard granulated white sugar as long as you make sure it fully dissolves during the boiling step.
Heavy cream can take the place of the pure cream, but keep in mind this will result in a slightly thicker glaze.
Storage
The finished cake can be stored uncovered in the refrigerator since the glossy coating completely seals the baked layers inside.
You can leave the coated dessert out at room temperature provided your environment stays below 77°F (25°C).
Serving
Sprinkle edible gold dust or apply small flakes of gold leaf over the top of the cake to beautifully disguise any lingering surface blemishes.
Common mistakes
Pouring the hot mixture directly onto an unfrosted cake results in a bumpy texture as the liquid absorbs right into the crumb.
Pouring the glaze while it is hotter than 86°F (30°C) will melt the underlying ganache and cause the coating to slide off.
Transfer the cake to your serving plate before ten minutes have passed to avoid tearing the bottom edges of a fully set glaze.
Never touch the shiny surface once it sets because it will leave permanent fingerprint marks that cannot be smoothed out.
Techniques
Twisting the bowl of warm liquid rapidly back and forth forces any trapped air bubbles to gather in the center for easier removal.
Elevating a cake on a wire rack set over a catching tray allows excess liquid toppings to drip off evenly without pooling at the base.
Pressing a sheet of plastic wrap directly against the surface of a warm custard or glaze prevents a rubbery skin from forming as it cools.
Warming a sharp knife in hot water and wiping it completely dry between cuts guarantees perfectly clean slices for any soft or sticky dessert.
- Store
- The finished cake can be stored uncovered in the refrigerator since the glossy coating completely seals the baked layers inside. You can leave the coated dessert out at room temperature provided your environment stays below 77°F (25°C).
Is there a shortcut glaze made from sweetened condensed milk plus melted dark chocolate?
Mixing sweetened condensed milk into melted chocolate creates a thick, rubbery glaze that goes completely dull after 36 hours. Rely on the gelatine and cocoa powder to ensure the surface holds a lasting shine.
What happens if I use low-fat milk or cooking cream?
Using low-fat, cooking, or shelf-stable cream prevents the mixture from setting correctly. You must use pure cream or whipping cream to achieve the right consistency.
How many days ahead can I make the mirror glaze?
You can make the liquid mixture ahead of time and keep it in the refrigerator for up to one week. When you are ready to coat the cake, reheat it in short microwave increments and strain it to remove any newly formed bubbles.
How do I pop tiny bubbles that appear on the cake after pouring?
Pop stubborn surface bubbles by rapidly sweeping a torch flame across the fresh coating. Keep the fire moving quickly so it breaks the trapped air without melting the chocolate finish.
Can I use an airy sponge cake for this dessert?
Airy, delicate sponges are not a good match for a mirror glaze because they will easily dent. You must build this dessert with a robust baked base that can properly support the necessary smooth, chilled layer of chocolate ganache without sinking.
Is there a trick to frosting the cake layers quickly without doing a crumb coat?
Squeeze the dark chocolate ganache over the stacked layers in a snail formation before spreading it flat with a spatula. This approach traps stray crumbs beneath the frosting, skipping the need for a crumb coat and providing a flawless base for the liquid coating.
Why should I sift dry powders before mixing them into liquids?
Sifting removes compacted lumps that are difficult to break apart once they get wet. This simple step ensures your final mixture stays completely smooth and free of dry pockets.
Can I freeze a finished cake that has a gelatin-based coating?
Store the finished cake uncovered in the refrigerator, since the coating completely seals the layers inside. Placing a fully glazed dessert into the freezer is not advised.
Add a private note
Private to this device - jot your tweaks, swaps and timings. (Syncs to your account later.)
What to serve with it
See all →





You might also like
See all →

The Friday 3-recipe dinner plan 🧡
Every Friday: three tested weeknight dinners + one shopping list, ready to go. No spam, ever - unsubscribe anytime.